The ultimate guide to
Deploy a node.js app to your linux server
Instead of paying a company a lot of money every month you can easily self-host any javascript application on your own server or a server that you rent from any vendor. Instead of paying per app, you can pay for an entire server and learn how to easily self-host your applications there. Even if this guide will be tailored for node.js, with some tweaks it works for most other languages as well.
This will be a free of charge, complete guide on how to take your application to production. If you follow this guide you should have your app in production in an hour or so. This guide is targeting people who do javascript development and are intermediate to experienced but are a bit unsure on how to actually host apps themselves. Throughout the guide I use Pop!_OS from System76. If you use Mac most if not all commands should work exactly the same but if you use Windows you may have to google for alternatives depending on your windows installation. As long as you use the latest version of Windows with powershell, most of the commands should work fine as well. This guide is obviously not targeting extremely high traffic websites that need several servers and load balancing. Before we get started, here is some reasons why you should self-host your app:
- Control. With your own server you will have control in how the resources are being used, you can install any software you want and you will be in control of the data integrity meaning you get to decide who will be able to view your data.
- Performance and price. You can host all your applications on one server if you wish and get the most performance out of the money you choose to spend. Stop paying per application and save money. No need to be afraid of scaling costs.
- Freedom. Get ultimate freedom by self-hosting your app. Skip being beholden to a specific company, to their tech choices, to their political agendas, to government surveillance of foreign state actors. You can host your app on a raspberry pi in your closet if you really want to.
1. Getting server access and DNS settings
1.1 Provisioning a server
There are many different ways of getting access to a server. Maybe you have your own server in a rack, maybe you rent a server from a VPS vendor like DigitalOcean or GleSYS. Perhaps you have a raspberri pi at home that you want to be hosting your app on?
Personally, I host all of my apps on a single powerful server from Hetzner (this post is not sponsored by anyone and is just my personal choice). Anyway the thing you do is to setup a server on the vendor of your choice (unless you have one yourself).
I chose an Ubuntu server installation since I am most comfortable with it, but you can choose any linux distribution. Ubuntu is probably the most common and easiest choice. Note that if you chose another linux distribution you will need to swap the apt package manager commands to whatever package manager your distribution uses.
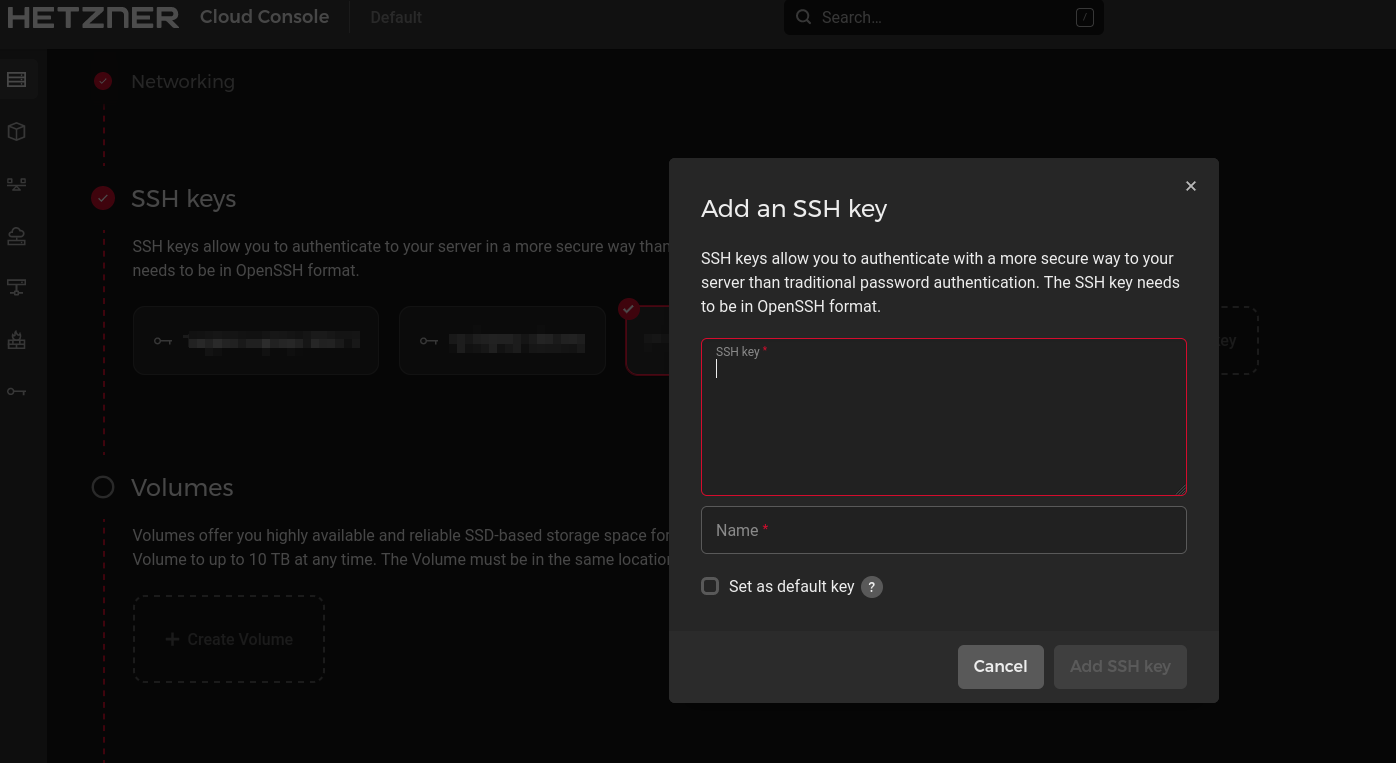
What Hetzner and many other vendors will do is to install the server for you and enable ssh login. For that to work you have to paste your ssh public key into the server setup page so that you will be able to ssh into the server once it has been provisioned.
If you use git in your app then you most likely have a valid ssh key you may use already. If you are unsure or want to read more about it or simply generate a ssh-key, you can use this great guide from Github. However now it is very important to back it up or else you may lose access to your server forever. Just copy it to whatever backup you have.
When I run the following ls ~/.ssh/ I have the following output:

All I need to do now is simply to copy it, so I run cat ~/.ssh/id_ed25519.pub to print it:

Simply select the entire output and paste it into your vendors ssh key window like this one at Hetzner:

When you are done creating your server you should be given an ip-address to connect to it. On Hetzner I get an ipv4 and an ipv6 address.
1.2 Changing DNS settings
Here I like to immediately add my domain name (if you have one) so that I have that already setup when I will configure my webserver.
Plus DNS changes can take some time in order to propagate through the internet but usually goes pretty fast for most people.

I simply add my ipv4 addresses to the @ (for the naked domain without www in front) and www for the A settings page. Then I add the ipv6 addresses to the AAAA section. What the letters say is that it is telling DNS servers how to resolve the domain name so the traffic goes to the correct server. You can use CNAME as well for the www subdomain, but it isn't necessary in this case. I won't go into more details on how DNS-servers work since it isn't really important for this article, but you can read more about it here.
2. Logging in and installing dependencies
Now you should be able to log in to your server with ssh by using the command: ssh root@yourdomain.com answer yes to the question raised (if the DNS hasn't propagated yet, swap it with the ip address).
Your provider could also set up the server with a user that have sudo access, and then you need to swap root to that user.
If you already have a user, make sure it is added to the sudo group and prepend any system commands with sudo.
Quickly update the system with this command: apt update && apt upgrade -y
2.1 Disabling password logins
The next step in the guide would be to instantly disable password login with ssh in case if your provider already hasn't done so. This means that the only way you will be able to login is with your ssh key so make sure to have it backed up!
- Install vim:
apt install vim -y - Open the ssh server config file with vim:
vim /etc/ssh/sshd_config - Search by hitting
/PasswordAuthenticationand hit enter - Replace
#PasswordAuthentication yestoPasswordAuthentication noby pressingito get into insert/edit mode - Save and exit by pressing
escand writing:wq(write and quit) and hit enter
Now no one except you with the ssh key should be able to log in to your server.
2.2 Creating a user and adding it to the sudo group
- Add your personal user
adduser yourusername - It will ask you some basic questions but the only real thing you need to set is a password
- When it is done add the user to the sudo group, so you can do changes as root
usermod -aG sudo yourusername - Now we must add the public key to the new user so that you can log in with it, open a new terminal window and run the following command
cat ~/.ssh/yourkey.pub, remember that you can list your keys withls ~/.ssh/ - Now copy the key from the new terminal window and go back to the original one and open the authorized_keys file by running
vim /home/yourusername/.ssh/authorized_keys - It will be a blank file so just enter insert/edit mode again by pressing
i - Paste in your key and save the file and exit by pressing
escand write:wq(write and quit) and hit enter - Make sure that both the root authorized_keys and yourusername's authorized_keys look the same by printing it out with
cat /root/.ssh/authorized_keysandcat /home/yourusername/.ssh/authorized_keys - They look the same? Great, if the root user doesn't have one you can paste it like you did with yournewuser and vim. This will make sure that you can log in as root in the future.
Now open yet another terminal window or tab and try to ssh into your new account: ssh yournewuser@yourdomain.com answer yes to the question. If successful, great now you may log out by running exit.
Note that if you have any issues during this step, or if you enter an incorrect ssh public key then you won't be able to log in to your server. So please make sure that it works and if you continue to have problems you may enable password authentication again and come back to this later.
2.3 Installing nvm, node, pm2, git and caddy webserver
Now we have set up the initial user on the server and given it access. So lets log out as root and log in as your new user instead.
Simply write exit in your terminal window with the root user and rerun the ssh command by hitting the arrow up key.
ssh yourusername@yourdomain.com.
Go to the nvm repository and follow install instructions.
NVM is short for Node Version Manager and makes it easy to install the version of node you need. It will also make it easy to update versions later.
Then install the version of node you need for you app, if you are unsure you can just run nvm install node and it will install the latest version.
Then simply install the Caddy webserver by following the install instructions on this page. Caddy is a pretty awesome piece of software that handles TLS for you via let's encrypt, so you don't have to struggle with nginx configs or the certbot.
Install git by running your package manager, if you use Ubuntu it is: sudo apt install git -y.
I assume here that you are using git, but in case that you use any other version manager you will have to swap that with whatever you use.
If you don't use a version manager you probably should consider learning git. If you really don't want to use git, you can use ssh to transfer your files with scp/sftp.
Install pm2 by running a npm command that will install it globally: npm i -g pm2.
PM2 is a program that helps you to run your apps easily and scalable with clustering. You won't need to create a systemd service for it, and it will help you autostart it after a reboot.
If you don't want to use PM2 for whatever reason, you need to instead create a systemd service file.
3. Downloading the code, make configurations and starting the app
We're almost done, actually. Just a few simple steps left. First you need to create a server public key and add it to git. All these steps are done on your new server over ssh. You can use this great guide from Github again. Then add your key to your github account, the same guide will work for Gitlab and Bitbucket as well.
3.1 Downloading the code and installing dependencies
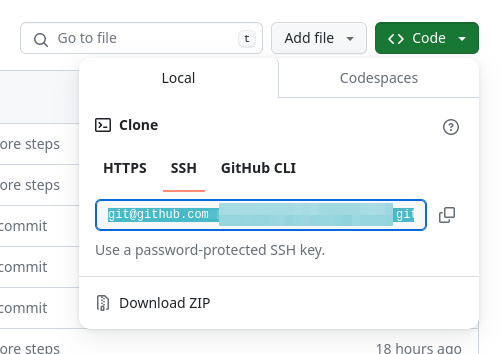
When you are done, simply download the code on your server by running git clone git@github.com:user/repo.git.
You get the repo link by simply pressing the code button on github:

Now you need to step into the new folder created on your server and run npm install and any other build steps you may have.
You do this by using the cd command which will change directory.
Like so: cd repo && npm i. Repo in this case is the folder for my repository.
3.2 Creating an ecosystem config file for PM2
You don't have to, but I strongly recommend to create an ecosystem config file for pm2.
It is a file that tells pm2 on how to run your app. Simply run pm2 init simple and it will create an ecosystem.config.js file in your folder.
This is an example for a remix app:

The name is just a string value that will help you manage your app in production and the script configuration is just to tell pm2 on how to start the app.
This can differ from app, so make sure to check out on how to start your app. It can be as simple as script: "node app.js".
If you want to set specific environment variable for your app, you can do it as I have done with the port in the example above.
If you want to run your app in clustered mode, you can read more about it here. Cluster mode is a way to run one instance of your app on each cpu you have available. Remember that memory is not shared between these so if you use in memory cache, you will maybe have to use something like Redis.
3.3 Starting your app
If you use the ecosystem config file, you can just run: pm2 start ecosystem.config.js and the app will start.
If you encounter any error, simply run pm2 logs to see the app logs or pm2 list
to list your app and there you can see more info. You have more commands available with pm2 -h
In case you didn't use the ecosystem file, you have to run pm2 start app.js for example. It will basically run node app.js under the hood.
You will have to tweak it if you have a different way of running your app. You can basically copy anything from the scrips in the package.json file.
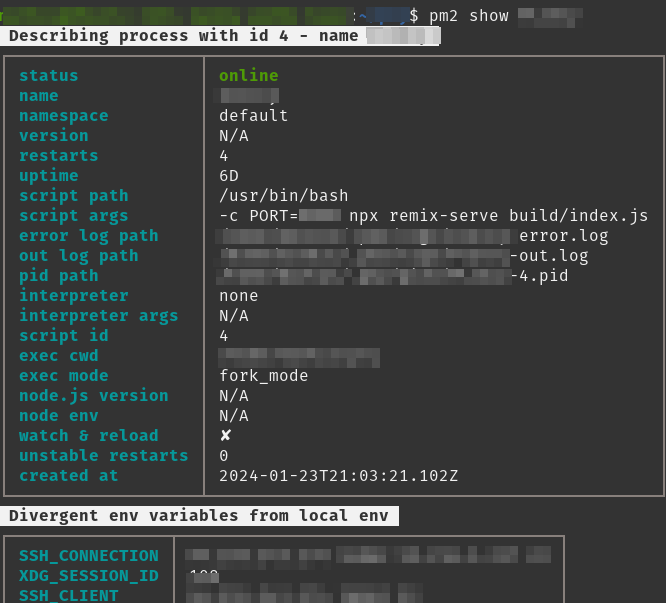
When you have started your app you can view some details about it with the pm2 show app command. Here I show one of my Remix apps:

In order to make the app start automatically we need to run a few commands:
pm2 startup will run and generate a command that you need to copy and run:

Then it is just a matter of saving the current setup pm2 save.
Now your app will reboot with the server. How simple!
3.5 Adding your reverse proxy
When you have started your app, all that is left is basically only to update the Caddyfile with a new reverse proxy for your app. You can do this by either creating your own caddy config that the main config includes or simple just edit the main config directly. I usually edit the main configuration directly since Caddy configurations is very minor most of the time.
sudo vim /etc/caddy/Caddyfile and press i for insert mode.
Now simply paste in the following after the comments (assuming the app is running on port 3000):
yourdomain.com, www.yourdomain.com {
  reverse_proxy 127.0.0.1:3000
}
Now save the file again with esc to exit insert mode followed by :wq.
You should now be able to restart caddy with sudo systemctl restart caddy.
If you wait a couple of seconds, then you should be able to go back to your local computer and visit yourdomain.com
and the app should turn up, with https enabled.
Congratulations! Your app is now live. 😎
Finishing thoughts
I can already hear the screams from certain people. What about no downtime deployment?? What about continuous integration?! The list can go on. Sure, you can make a lot of improvements or changes to this sort of deployment, but it works for smaller scale projects. This was an intro on how to deploy your own app and from here you can go read on whatever you like to add to your deployment pipeline. Let's face it, pretty much all big companies won't be reading this guide anyway since they are way too busy with their kubernetes clusters.
I hope you have learned a lot and will not be afraid to host your own projects in the future. This blog post was to aspire people to dare to self-host things instead of relying on megacorps that actually can be pretty pricey. If you like this article and want to support me, you can follow me on X or visit my other website where this guides like this are published node.school.